PiMP and 60lbs Upgrade

Ok, I did make it too fat up high but you kept saying “You’ll blow a head gasket kid!” So this is better, just need to smooth out surrounding cells. Hope my timing table is okay, I’ve got pulling plugs for reading down to 30 minutes after all this.

Haha yeah better safe than sorry but anything in the 10's is too much! Your timing looks pretty good, I'd mainly keep an eye on that as we start to heat up. I can't remember if I've recommended this, but for reading plugs there is no better guide than this video by Steve Morris. Helps you read both timing and AF.

 
Data log is showing 11.3:1 (on 11.5 commanded) where the cursor is, which is pretty much WOT. That's dead on. Your AFR goes low when you lift, even though commanded goes up, but that's where dialing in decel fuel cut comes into play. If you don't have cats, it's not something to really worry about, BUT, that kind of fueling will make reading plugs for timing pretty difficult.

In my opinion, your timing table is solid at 100 kpa and looks reasonable from there up, so you're on the right track. But you can put a lot more in it under 100, especially in the mid range, which will make it a bit more "sassy."

The VE on the cursor track up through the boost and revs looks like what I'd expect, too. You'll want to smooth that valley into the surrounding cells.

What cam is in it? Now that you've put heads/fresh gaskets/fresh head bolts in it, your risk to the head gaskets has dropped a lot.

I'd sure normalize the scales on both of those tables. My brain can't handle having different values on the axes!
 
Last edited:
Haha yeah better safe than sorry but anything in the 10's is too much! Your timing looks pretty good, I'd mainly keep an eye on that as we start to heat up. I can't remember if I've recommended this, but for reading plugs there is no better guide than this video by Steve Morris. Helps you read both timing and AF.
Steve Morris knows his stuff.
 
Data log is showing 11.3:1 (on 11.5 commanded) where the cursor is, which is pretty much WOT. That's dead on. Your AFR goes low when you lift, even though commanded goes up, but that's where dialing in decel fuel cut comes into play. If you don't have cats, it's not something to really worry about, BUT, that kind of fueling will make reading plugs for timing pretty difficult.

In my opinion, your timing table is solid at 100 kpa and looks reasonable from there up, so you're on the right track. But you can put a lot more in it under 100, especially in the mid range, which will make it a bit more "sassy."

The VE on the cursor track up through the boost and revs looks like what I'd expect, too. You'll want to smooth that valley into the surrounding cells.

What cam is in it? Now that you've put heads/fresh gaskets/fresh head bolts in it, your risk to the head gaskets has dropped a lot.

I'd sure normalize the scales on both of those tables. My brain can't handle having different values on the axes!
As far as cam, I don’t know specifics except it’s a roller, pulls about 10” at idle (750).

I did clean the scales up and smooth out the tables. It bothered me too but I got all excited to log more data and had to leave some nerd knobs to turn later.

For “midrange” do you mean relative to the RPM/ignload like 64kpa - 90kpa?

+1 Steve Morris is a champ, also didn’t know there was a spark plug cutting tool.
 
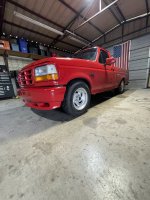
Took a 40 mile round trip drive on Sunday and was pretty happy with the civility and manners of the truck when driven “normal”. Apart from the blow off and V-1 you wouldn’t know it can go Bruce Banner to full on Hulk with a blip of the throttle.

Beside scaring cows on back roads I’ve been planning sorting out the rear suspension. Mines all stock so I’m thinking of removing the slapper and overload + Caltracs (local pickup at Summit) . I read back and forth where Jaime V says long bars but dudes chime in with Caltracs. I’d run long bars but need them in 7 days, can’t wait “We have a proper designed set in the works, but are a 2~3 months out” time. I can fabricate if anyone knows a good kit ready to go. I’ll measure for shocks after I get the rear settled down.
 
Nothing at all wrong with Caltracs. People run hard with them. I wouldn't hesitate to use that setup, and probably will if I ever decide to make the white truck dig.
 
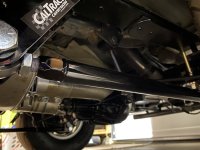
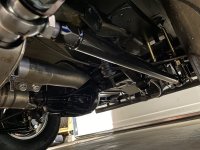
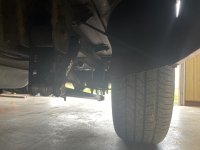
Installed Caltracs and removed the slapper + overload spring. Ended up with QA1 TS807 shocks. While I was under there adjusting and tweaking the Caltracs I realized my rear drop shackles are not going to work and I may need another 2* of shim. I'll replace the shackles Monday and recheck everything. There isn't a lot of suspension travel under there to work with. I think I'm at 3" between the axle and frame? And that is without me or a full tank of gas.

Trimmed down the factory bump stops and went for a ride, the shocks are the big money maker. While cruising down the farm roads it rides nice. I'm adjusted to 6 clicks. I'm going to toss in a set of stock rear shackles and then adjust the Caltracs to preload. I can already see improvement on the 1-2 shift as it chirps it jumps forward instead of a flat spin.

As a note Calvert provides very basic instructions for the install. These are not bolt on and go, you will need to measure, adjust, load/unload, bounce, loosen, tighten then rinse repeat until the rear axle mounts are in the correct position. I watched a few videos of people installing them without setting the lower axle mount in relation to the upper axle pad. It can change the position of the bars rear pivot by 1/2" to an 1". The lower axle mounts can clock changing the rear pivot forward or backward. I found finger tightening the u-bolts evenly unloaded then loading (setting down) to let it self center got it pretty square. When it seated to what I determined was square both sides were even. in the front the pivot plates need to swing free, I had to clearance a leaf spring a bit on one side that was a bit fatter on the end.
 
Theres a few very good write ups on YellowBullet about setting them up. You will probably have to search google to find them, they are older posts.
 
Installed Caltracs and removed the slapper + overload spring. Ended up with QA1 TS807 shocks. While I was under there adjusting and tweaking the Caltracs I realized my rear drop shackles are not going to work and I may need another 2* of shim. I'll replace the shackles Monday and recheck everything. There isn't a lot of suspension travel under there to work with. I think I'm at 3" between the axle and frame? And that is without me or a full tank of gas.

Trimmed down the factory bump stops and went for a ride, the shocks are the big money maker. While cruising down the farm roads it rides nice. I'm adjusted to 6 clicks. I'm going to toss in a set of stock rear shackles and then adjust the Caltracs to preload. I can already see improvement on the 1-2 shift as it chirps it jumps forward instead of a flat spin.

As a note Calvert provides very basic instructions for the install. These are not bolt on and go, you will need to measure, adjust, load/unload, bounce, loosen, tighten then rinse repeat until the rear axle mounts are in the correct position. I watched a few videos of people installing them without setting the lower axle mount in relation to the upper axle pad. It can change the position of the bars rear pivot by 1/2" to an 1". The lower axle mounts can clock changing the rear pivot forward or backward. I found finger tightening the u-bolts evenly unloaded then loading (setting down) to let it self center got it pretty square. When it seated to what I determined was square both sides were even. in the front the pivot plates need to swing free, I had to clearance a leaf spring a bit on one side that was a bit fatter on the end.
Do you have pics?
 
As far as ride height on my rear removing slapper+overload and keeping drop hanger and drop shackles it’s terrible. Wouldn’t recommend.

-edited for clarity
 

Attachments

  • D58C8B07-D8FB-407D-9236-5F1443FA2D10.jpeg
    D58C8B07-D8FB-407D-9236-5F1443FA2D10.jpeg
    225.2 KB · Views: 19
Last edited:
Yeah I went back to stock shackles too
I read through your posts re: Calvert brackets and spring tricks etc. appreciate the detailed pictures. I would have had to make three runs to Summit Racing if you didn’t mention Rancho clamps, center pin bolt, bushings etc.

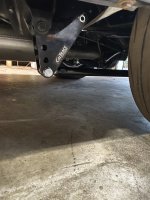
That being said I changed over to stock shackles today. I gained an inch measuring at the wheel opening. I discovered it also has a front drop hanger I'm just going to leave. I think I will live with the clearance I have now, trim up the bump stop as needed. 3 inches to the frame from axle. I was able to put in some energy suspension bump stops and it feels good on the road.
 

Attachments

  • IMG_2705.jpeg
    IMG_2705.jpeg
    132.2 KB · Views: 20
I use the Energy Suspension button stops in the rear. I have shackles and hangers, but I've only removed the slapper. I'm pretty happy with the way it works like that. It does occasionally hit the stops, and that can be jarring, but overall I'm good with it since I didn't want to notch the frame.
 
Thanks. Pics help a bunch. I have shackles on the rear. I may end up just removing the slapper and installing bars. I just need another inch or so and hopefully soon a bunch more traction.
 
Thanks. Pics help a bunch. I have shackles on the rear. I may end up just removing the slapper and installing bars. I just need another inch or so and hopefully soon a bunch more traction.
I think Raymond has it right by going traction control. Safer for the street. If I can do it using stock VSS and a front wheel sensor I’ll go that route.
 
I put some time into straight Accel-Pump and think that’s where the truck and my driving style belong. It has more bins and just feels more crisp to me.

Idle is sort of a dance for sure. I had to go to a smaller alt pulley to keep voltage up since 750-780rpm which made the AFR more consistent at idle. I run a smaller crank pulley so was dipping 12.3v and lower making AFR ebbs and flows. @ 13v AFR is solid. I have a powermaster coming this week, just for peace of mind.

Now I’m looking at my VSS sensor, and fix the bouncing speedo issue I’ve had. Luckily my bounce is in the 70mph and higher range so crossing my fingers cleaning/replacing the VSS sensor will exorcise that demon.
 
Back
Top