Good use of quarantine time!!
You are using an out of date browser. It may not display this or other websites correctly.
You should upgrade or use an alternative browser.
You should upgrade or use an alternative browser.
My Mom's 1986 Ford Crown Victoria
- Thread starter XLTbeater
- Start date
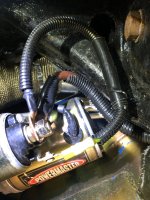
I also realized that I need to reconfigure the starter solenoid back to the original configuration. I'm going to eliminate the signal/ignition wire to the solenoid and put the jumper in its place. The more I look at the other wiring diagrams; the more I'm thinking that's the way the Powermaster starters are configured.
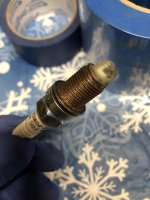
I took last Friday off to use up the sick days I didn't take this year. So I used that day to run errands and get a couple things done. Replaced the heater blower fan and blower resistor module in my Grand Marquis. Whilst getting those parts, I got another tarp for the Crown Vic, since the top layer/tarp (3 layers of tarp) was coming apart. I peeled all of the tarp off to put the new one underneath them. I discovered that some vermin chewed up a small section of the 3rd layer and used it to make a small nest under the windshield. So I grabbed the vacuum cleaner and cleaned all of that up. I figured since I done that, might as well clean whole cowl and some of the engine compartment. Then for whatever reason, I started pulling plugs and inspecting all the wires. I found a few plugs had some gel form on the electrodes. I have no idea what it is. It looks like vaseline. Does WD-40 gelatinize? That's the only thing I can think of.
I would post pics, but my files are invalid now for whatever reasons.
I would post pics, but my files are invalid now for whatever reasons.
Dielectric grease? I put that on the plugs.
Oh! Varnish from old gas maybe?
Perhaps that's what it is. I know for my first 1st-start attempt, the fuel pump activated and I got a click from the starter before everything shutdown. Maybe the injectors did their thing and that gas just sat in the combustion chamber. In any event, I will wipe them down and spray the electrodes with gum cutter before I try another 1st-start attempt.
I did a little work on the Crown Vic over the weekend. I was only going to replace one of the tarps that deteriorated. I ended up replacing one of the bottom tarps as well, as a rodent of some sort chewed through a section. With all the sunlight and all of the tarps pulled back; I looked at the engine and decided to rewire the starter. I took the old signal wire off and cut off the spade terminal. I took another (unused) wire that had a ring terminal and soldered it to the small section of signal wire that I had just cut. This is my jumper wire between the battery+ and the ignition lug on the starter. Not much work, but it gave me a little bit of motivation to start working on that car again. I have to turn the engine over next weekend. I hope it has not seized since the last 1st start attempt. It should still have trans fluid in the cylinders though.


Never seen anything remotely like that sparkplug. That is downright bizarre. Aliens...


