
-=TWITCH=-
"Bring it"
First off I want to say thanks once again to NLOC for all the great members and always helping out. I have been going over my truck with a fine tooth comb for the last couple of weeks getting it ready for spring and summer, the Gen2 Springtime Checklist really helped out so thanks for that.
So the Gen 2 Check list brought me to my intercooler pump, and guess what no worky Well after pulling out the pump and using two wires with a 12v battery I was able to determine the pump did not run at all, and it was not the plug.
Before spending 85.00-100.00 on a new pump I really wanted to see what causes the pumps to fail. Having a pretty extensive background in electric RC car racing I am pretty knowledgeable about electric motors. I started to dismantle the pump and immediately realized the pump is built pretty well and it seems that it can be rebuilt. I am not very good at how-to guides but I will do my best ;o
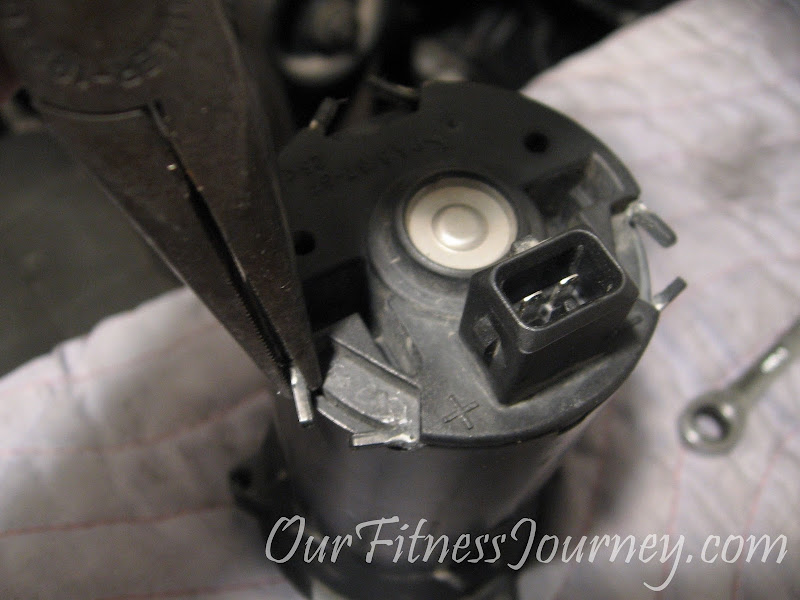
First you need to bend out each tab on the can that houses the electric motor. I used a pair of needle nose pliers to bend out each tab. The impeller side of the motor is a little bit more tricky than the rear.
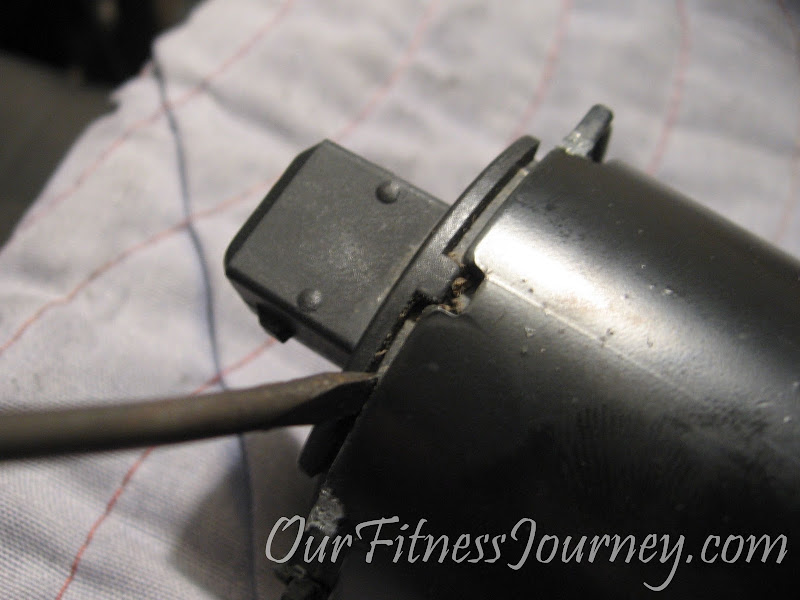
Then use a small flat head screw driver to gently pry the rear comm housing from the can. Work it off just like you would a paint can lid a little at a time all the way around the can.
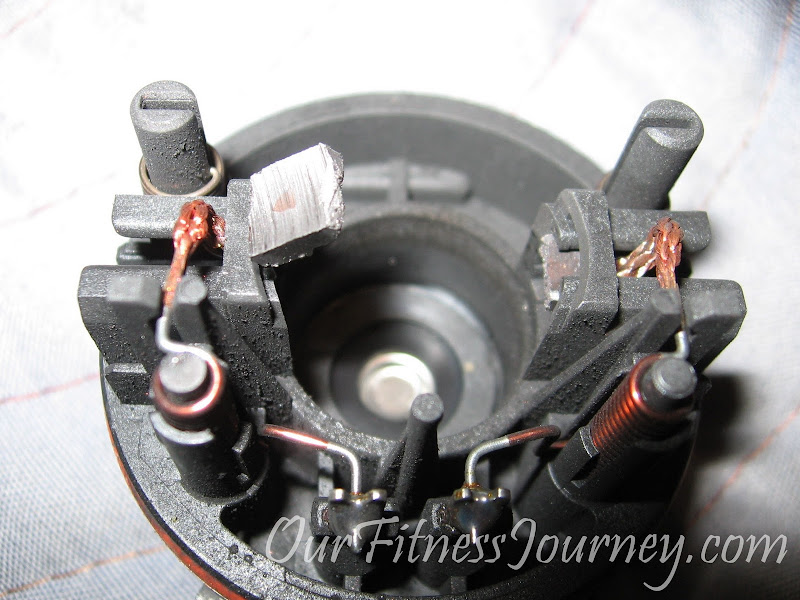
Once you remove the rear brush housing it will look like this. Right away from this pic I was able to determine why are pumps stop working. The comm brushes need to be replaced. A lot of people have posted that they have cleaned their intercooler pumps and have found a massive amount of "black powder" once they remove the impeller housing. Well this black powder is actually carbon from the brushes that make contact with the comm, this is normal wear and over time the brushes need to be replaced.
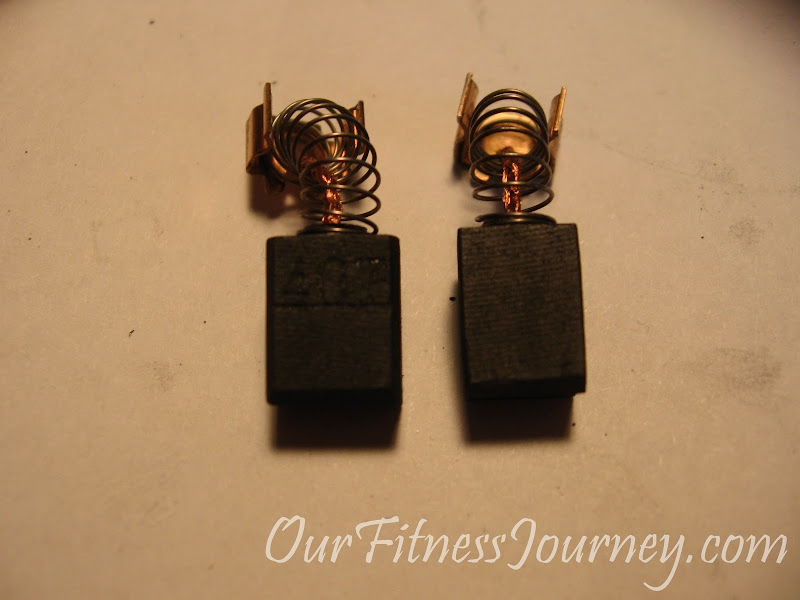
There are two brushes inside the can that make contact with the comm, you can see the worn out brushes in the the picture below, they have a small copper braided cable attached to them. The Brush on the left has actually worn all the way down and you can see the copper cable showing through the brush. The brushes are spring loaded to keep constant pressure against the comm. If they wear far enough down the comm can actually suck in whats left of the brush and jam the motor inside the can.
After looking at the brush housing I got very excited because the brushes can be replaced very easy by desoldering two points.
The below picture shows the two points you need to desolder to remove the brushes. Once you get the solder points hot enough the entire brush assemble slides out.

The below picture shows the brush assembly removed from the brush housing.
The next part was a PITA,I spent hours tracking down replacement brushes. I searched the net high and low trying to track down BOSCH replacement brushes to no avail. I waited till the morning and called BOSCH and spoke with an engineer, and guess what BOSCH does not make any replacement parts at all for this pump:headscratch: but after talking with the tech for a bit we both decided that my best bet would be to try and find another brush that is similar that might work.
I called around town and found a local electric tool distributor and repair shop, headed to the shop with my brush housing in hopes of finding something that might work. I was very lucky to get some help from the shops tool repair guy and we dug through about fifty different brands and styles of brushes and finally found one that was very close to fitting, but would take a little modification to work.
I ended up with a set of brushes from Makita
Here is a link to the brushes:
eReplacementParts.com : Carbon Brush Set CB-407 [191927-6] - $6.75

Now I know the brushes look totally different from the brushes in the BOSCH pump but they are the closet fit I could find, the Makita brushes are about 2mm to wide to fit into the BOSCH brush housing but some sand paper will fix that. I suggest purchasing at least 2 sets of these brushes in case you destroy one while modifying them.
The below pic shows the sanded modified Makita brush on the right and the stock Makita brush on the left, this gives you an idea how close of a fit the Makita brush is and just a little carbon needs to be removed. Do not use a dremal or any high speed sander just use a good ole piece of sand paper placed on a flat surface and drag the brush slowly back and forth to remove the carbon. The brushes are just compressed carbon and are pretty soft. Take your time and after a couple of swipes over the sand paper check to see if the brush will slide into the brush housing. You want it to slide freely with no binding and as little play as possible. Did I mention take your time! You can't add any carbon back if you remove to much :nono:
Below pic shows the new Makita modified brush in the brush housing.

Next you are going to have to cut the copper braided cable from the stock bosch brush, cut the cable as close to the stock brush as possible to give you additional slack. The Makita copper cable is not as long as the BOSCH cable and you are going to need that little extra slack ( I learned this the hard way, so you don't have too)ldtu:
You are also going to have to remove the metal base plate and spring from the Makita brush. I used needle nose pliers to pry and bend away the metal base plate from the copper cable.
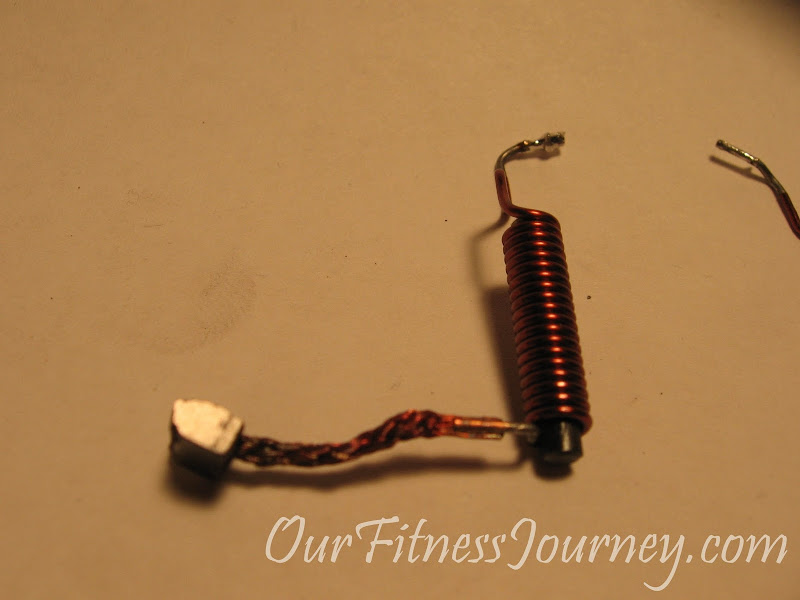
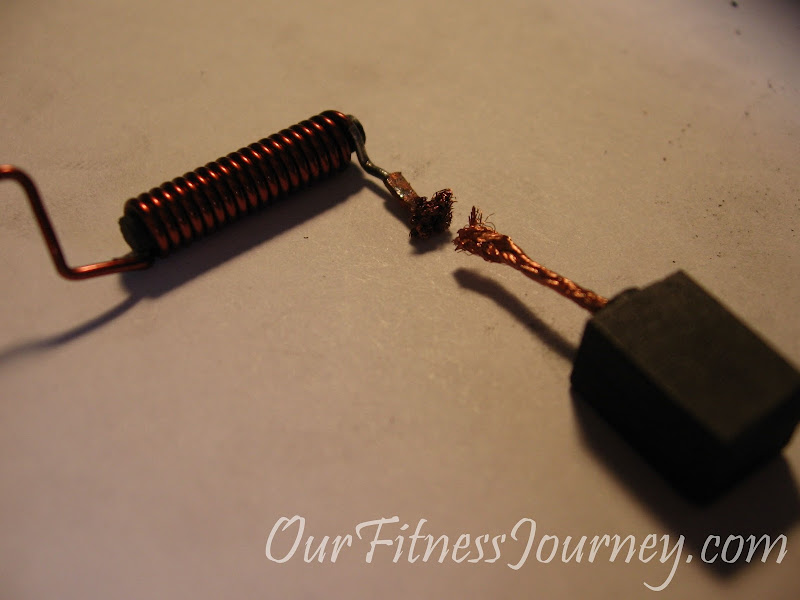
The below picture shows the cut BOSCH cable and the new Makita Brush with spring and base plate removed and ready to connect. I frayed both ends of the cut cable a little and then wiggled both frayed ends together to try and intertwine the cables as best as possible. I then used a pair of pliers to smash the two cables together making a tight secure connection for the solder.
Once you Solder the new brush onto the BOSCH coil reinstall the coil and brush into the housing and use the spring coil to hold the new brush in place.
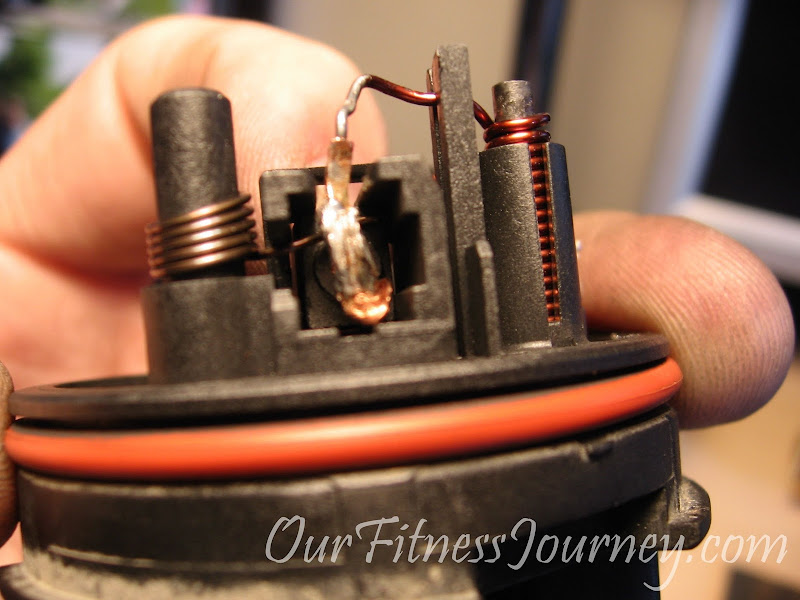
The below pic shows the new brush installed into the bush housing. Also from this picture you can see that I had to remove one coil on the copper wire to lengthen the braided cooper coil because I did not have enough slack because I cut the stock brush off of the copper closer to the copper wire vs. closer to the brush head.
You can also see the tension coil spring on the left post that hold the brush in place and provides a steady tension against the comm.
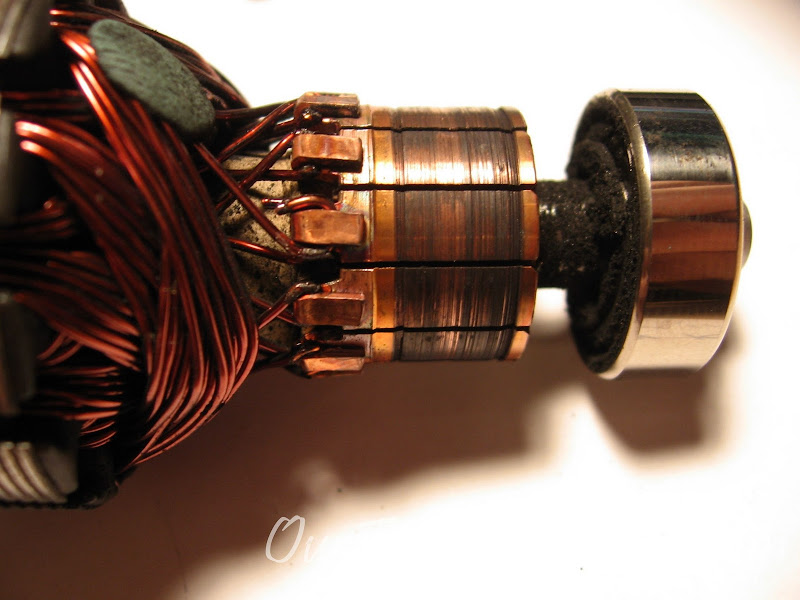
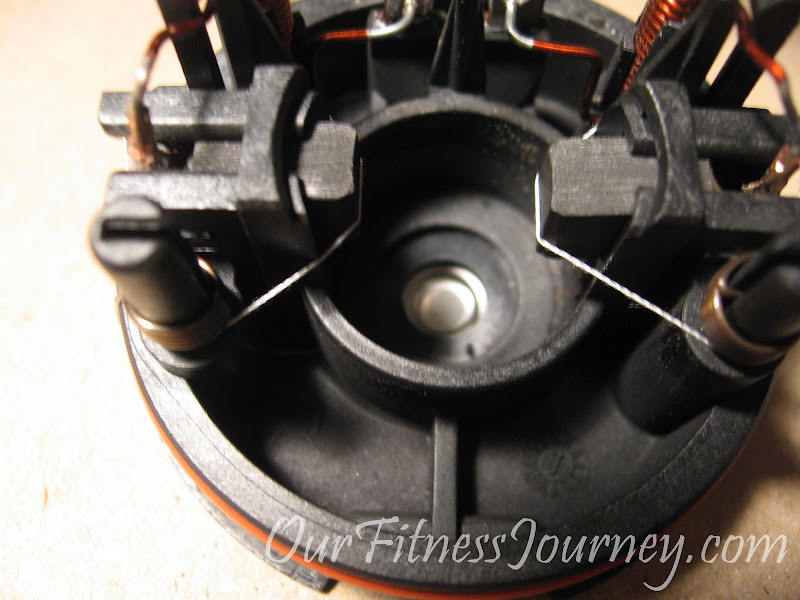
The hardest part of this entire install is putting the brush housing back into the can over the comm and bearing. Since the brushes are spring loaded there is constant pressure pushing the brushes out the bottom of the housing blocking the path for the housing to slide over the comm bearing and then onto the comm. The below pic shows the comm bearing and actual comm. The brushes make contact with the copper part to the left of the bearing. So the spring loaded brushes have to pass over the bearing and then over the comm, there is not enough clearance to use a tool or a finger to depress the brushes to slide over the bearing and comm.
I have two tricks that I have learned over the years that will help you get past this part. Try this option first and if it does not work for you then give option two a try.
Option 1: Take some thin sewing machine thread and tie back the brushes. Try your best to get the brushes as flush to the housing as possible. This is hard because most cotton thread with stretch a little and allow the brush to protrude past the housing. The clearance between the brush housing the the comm bearing is less than 1mm on each side, its very tight.
The below pic shows the brushes tied back with thread.
However the brushes still stick out to far in the above pic to pass the bearing, but it will give you an idea how to tie back the brushes. If you can tie back the brushes enough to clear the bearing you are golden the comm is a smaller diameter than the bearing. Install the brush housing with the string holding back the brushes. Once the brush housing is installed in the can you simply take two wires connected to a 12v source and touch the back pump plug. As soon as the hot charge reaches the string it will incinerate the string releasing the brushes to make contact with the comm :tu: if the pump runs bend the tabs back in place and reinstall.
Option two:
Option two requires you to remove the brushes from the housing and sand a small 45 angle or slope on the lower side of the brush that makes contact with the bearing. You will then gently use pencil or a chop stick help the brush over the bearing. Slowly wiggle the brush housing back and fourth over the bearing. The angle sanded on the lower part of the brush will help the brush to retract into the brush housing when it makes contact with the bearing. Once it clears the bearing it will easily clear the comm and you are golden. :tu:I do not have a pic of option two because option one worked best for me. If you need a pic of this let me know and I will draw a diagram.
Also note once the brushes slide over the bearing and comm there is not removing the brush plate without breaking the brushes so take your time.
I hope this helps everyone, sorry for the length of this How-to but I wanted to show and explain as much detail as possible. It's not very hard once you have the pump apart and you can look at the pump. The entire fix will take anywhere from 1-3 hours depending on your wrenching and tinkering skills.
Cheers and enjoy your new working intercooler pump that cost $6.00
So the Gen 2 Check list brought me to my intercooler pump, and guess what no worky
Well after pulling out the pump and using two wires with a 12v battery I was able to determine the pump did not run at all, and it was not the plug. Before spending 85.00-100.00 on a new pump I really wanted to see what causes the pumps to fail. Having a pretty extensive background in electric RC car racing I am pretty knowledgeable about electric motors. I started to dismantle the pump and immediately realized the pump is built pretty well and it seems that it can be rebuilt. I am not very good at how-to guides but I will do my best ;o
First you need to bend out each tab on the can that houses the electric motor. I used a pair of needle nose pliers to bend out each tab. The impeller side of the motor is a little bit more tricky than the rear.
Then use a small flat head screw driver to gently pry the rear comm housing from the can. Work it off just like you would a paint can lid a little at a time all the way around the can.
Once you remove the rear brush housing it will look like this. Right away from this pic I was able to determine why are pumps stop working. The comm brushes need to be replaced. A lot of people have posted that they have cleaned their intercooler pumps and have found a massive amount of "black powder" once they remove the impeller housing. Well this black powder is actually carbon from the brushes that make contact with the comm, this is normal wear and over time the brushes need to be replaced.
There are two brushes inside the can that make contact with the comm, you can see the worn out brushes in the the picture below, they have a small copper braided cable attached to them. The Brush on the left has actually worn all the way down and you can see the copper cable showing through the brush. The brushes are spring loaded to keep constant pressure against the comm. If they wear far enough down the comm can actually suck in whats left of the brush and jam the motor inside the can.
After looking at the brush housing I got very excited because the brushes can be replaced very easy by desoldering two points.
The below picture shows the two points you need to desolder to remove the brushes. Once you get the solder points hot enough the entire brush assemble slides out.
The below picture shows the brush assembly removed from the brush housing.
The next part was a PITA,I spent hours tracking down replacement brushes. I searched the net high and low trying to track down BOSCH replacement brushes to no avail. I waited till the morning and called BOSCH and spoke with an engineer, and guess what BOSCH does not make any replacement parts at all for this pump
:headscratch: but after talking with the tech for a bit we both decided that my best bet would be to try and find another brush that is similar that might work. I called around town and found a local electric tool distributor and repair shop, headed to the shop with my brush housing in hopes of finding something that might work. I was very lucky to get some help from the shops tool repair guy and we dug through about fifty different brands and styles of brushes and finally found one that was very close to fitting, but would take a little modification to work.
I ended up with a set of brushes from Makita
Here is a link to the brushes:
eReplacementParts.com : Carbon Brush Set CB-407 [191927-6] - $6.75
Now I know the brushes look totally different from the brushes in the BOSCH pump but they are the closet fit I could find, the Makita brushes are about 2mm to wide to fit into the BOSCH brush housing but some sand paper will fix that. I suggest purchasing at least 2 sets of these brushes in case you destroy one while modifying them.
The below pic shows the sanded modified Makita brush on the right and the stock Makita brush on the left, this gives you an idea how close of a fit the Makita brush is and just a little carbon needs to be removed. Do not use a dremal or any high speed sander just use a good ole piece of sand paper placed on a flat surface and drag the brush slowly back and forth to remove the carbon. The brushes are just compressed carbon and are pretty soft. Take your time and after a couple of swipes over the sand paper check to see if the brush will slide into the brush housing. You want it to slide freely with no binding and as little play as possible. Did I mention take your time! You can't add any carbon back if you remove to much :nono:
Below pic shows the new Makita modified brush in the brush housing.
Next you are going to have to cut the copper braided cable from the stock bosch brush, cut the cable as close to the stock brush as possible to give you additional slack. The Makita copper cable is not as long as the BOSCH cable and you are going to need that little extra slack ( I learned this the hard way, so you don't have too)
ldtu:You are also going to have to remove the metal base plate and spring from the Makita brush. I used needle nose pliers to pry and bend away the metal base plate from the copper cable.
The below picture shows the cut BOSCH cable and the new Makita Brush with spring and base plate removed and ready to connect. I frayed both ends of the cut cable a little and then wiggled both frayed ends together to try and intertwine the cables as best as possible. I then used a pair of pliers to smash the two cables together making a tight secure connection for the solder.
Once you Solder the new brush onto the BOSCH coil reinstall the coil and brush into the housing and use the spring coil to hold the new brush in place.
The below pic shows the new brush installed into the bush housing. Also from this picture you can see that I had to remove one coil on the copper wire to lengthen the braided cooper coil because I did not have enough slack because I cut the stock brush off of the copper closer to the copper wire vs. closer to the brush head.
You can also see the tension coil spring on the left post that hold the brush in place and provides a steady tension against the comm.
The hardest part of this entire install is putting the brush housing back into the can over the comm and bearing. Since the brushes are spring loaded there is constant pressure pushing the brushes out the bottom of the housing blocking the path for the housing to slide over the comm bearing and then onto the comm. The below pic shows the comm bearing and actual comm. The brushes make contact with the copper part to the left of the bearing. So the spring loaded brushes have to pass over the bearing and then over the comm, there is not enough clearance to use a tool or a finger to depress the brushes to slide over the bearing and comm.
I have two tricks that I have learned over the years that will help you get past this part. Try this option first and if it does not work for you then give option two a try.
Option 1: Take some thin sewing machine thread and tie back the brushes. Try your best to get the brushes as flush to the housing as possible. This is hard because most cotton thread with stretch a little and allow the brush to protrude past the housing. The clearance between the brush housing the the comm bearing is less than 1mm on each side, its very tight.
The below pic shows the brushes tied back with thread.
However the brushes still stick out to far in the above pic to pass the bearing, but it will give you an idea how to tie back the brushes. If you can tie back the brushes enough to clear the bearing you are golden the comm is a smaller diameter than the bearing. Install the brush housing with the string holding back the brushes. Once the brush housing is installed in the can you simply take two wires connected to a 12v source and touch the back pump plug. As soon as the hot charge reaches the string it will incinerate the string releasing the brushes to make contact with the comm :tu: if the pump runs bend the tabs back in place and reinstall.
Option two:
Option two requires you to remove the brushes from the housing and sand a small 45 angle or slope on the lower side of the brush that makes contact with the bearing. You will then gently use pencil or a chop stick help the brush over the bearing. Slowly wiggle the brush housing back and fourth over the bearing. The angle sanded on the lower part of the brush will help the brush to retract into the brush housing when it makes contact with the bearing. Once it clears the bearing it will easily clear the comm and you are golden. :tu:I do not have a pic of option two because option one worked best for me. If you need a pic of this let me know and I will draw a diagram.
Also note once the brushes slide over the bearing and comm there is not removing the brush plate without breaking the brushes so take your time.
I hope this helps everyone, sorry for the length of this How-to but I wanted to show and explain as much detail as possible. It's not very hard once you have the pump apart and you can look at the pump. The entire fix will take anywhere from 1-3 hours depending on your wrenching and tinkering skills.
Cheers and enjoy your new working intercooler pump that cost $6.00