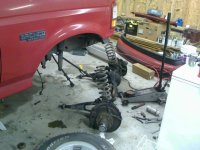
Bronco Lightning build

This is none of my business, but then again this project is getting into areas that have been somewhat deemed my territory.

I have some Qs.

Shall I ask them here, should I ask them via PM, or should I keep them to myself and
simply monitor the progress of this project?

Yo... Bumpy!!! How the hell are you?
Don't mean to jack the post but had to say hi and tell what's happening.

You thinking of building a BronkLe ?? I puked the tranny in my BronkLe last week and
since it's on the bench decided that now's the time to pull the transfer case from the back
of the trans, swap out the tailshaft, have a new, longer driveshaft ordered and Copperheads
D/S loop. Soooo, now it's 2WD and I'll be having the front and rear suspensions swapped in,
hopefully over the next couple of months.
 
This may help you avoid some probs

Suspension: Front
Start by removing the entire ttb setup..
1. Disconnect the abs sensors on the front two rotors in the engine compartment (just follow the lines up until you find the
connectors that should be attached to the fender liners.) If you do not have abs, disregard.
2. Next unbolt the calipers and leave the brake lines attached as you can reuse the same calipers for the 2wd rotors and do
not have to re-bleed the brakes..
3. Now disconnect the sway bar end links that attach to the part that sits under the coil spring. Pull the sway bar towards
the front of the bronco so it is out of your way, it does not need to be completely removed.
4. Separate the tie rods from the spindles with a fork tool.
5. Remove front driveshaft.
6. Now you ready to drop everything out!
7. Make sure the truck is supported from behind the radius arms with heavy duty jack stands and let the front end hang
under its own weight. At this time place a jack under the ttb on whichever side you are going to unsecure the springs and
shocks from truck. Jack it up to put pressure on the coil then remove the one bolt that holds the top of the coil in.
Now the coil should be loose. Then unbolt the shocks and remove jack. Repeat other side..
8. Unbolt the radius arms followed by the axles that attach to the crossmember directly under the motor. Be carefully as
the entire setup is extremely heavy and will almost fall out by itself!
9. Install the 2wd parts in pretty much the exact opposite order. The only differences being is that you will only have one
shock absorber on each side, and you will use the rear mount on the stock bronco shock/spring tower.
10. The sway bar will attach to the 2wd parts in the same manner as it did with the factory 4wd setup.
11. Get it aligned!

Rear:
I used first gen lighting complete rear (8.8 with drum) and the lighting rear leaf springs which are 2.5"
wide as opposed to the Broncos 3” wide springs. This imposed some creative thinking. To get a level
stance I had to get some AIM industries drop hangers (not shackles) and remove both the front and
rear leaf spring hanger/mounts. I then acquired some rear leaf mounts from a stock F-150 from a
junkyard with factory shackles. The hangers from AIM have different bolt holes to attach it to the frame
then the Broncos so I welded up the holes on the hangers and redrilled them to match the holes in the
frame on the bronco. With the Bronco sitting on the complete 95 lighting rear end with the leafs in the
lowest position it gives a level stance with stock 95 Lightning front springs. Sounds like a lot of work
but it gives a factory look because it tucks the leafs up out of site whereas doing a axle flip would leave
the leaf down low in sight of everybody. Now all I have left to do is remove half of the bumpstop and
put a small c-notch in the frame above the axle housing to clear it when I hit bumps. As it sits the stock
bump stop is ½” away from the top of the housing.

Using F-150 Lighting springs
1. Support the frame of the bronco and just barely let the tires touch the ground.
2. Using a center punch on the rivets that attach the hanger for both the front and rear of the leaf springs.
Use a 7/16” drill bit and drill through the top of the rivet head. You should be able to punch the rivet out
once you have drilled as deep as the frame.
3. Remove the hangers from the frame, then unbolt the leaf springs from the axle housing.

Tranny/Driveline:

1. Find a 2wd E4OD, I am not sure if the 4wd E4OD can be modified into the 2wd version. I think it has to do with different
tailshafts. (It can)
2. You will need the transmission crossmember from your stock 4wd E4OD plus one that bolts to that one that the tranny
mount bolts to. You can find them in junkyards or Ford for like $60 bucks.
3. All the plugs are the same except you won’t be plugging the transfer case in anymore so you can either cut it off at the
body (the harness) or zip tie it up. I chose to tie it up..
4. You will need to measure from the end of the aluminum tailshaft housing to the flange of the rear end and take that
measurement to a driveshaft shop and have a new one made. I got a brand new metal one made for $266. My measurement
was 39.25 inches but it will vary from truck to truck so make sure you double check your own.
5. This mod alone drops probably 150 lbs. The E4OD, transfer case, converter, and full of fluid was extremely heavy I would
guess over 350 lbs. Please be very careful when removing it!

 
Thanks for the input, i was kind of wondering what the best setup was going to be for the rear suspension, because I'd like to use the lightning springs
 
good info.. Im doing a conversion as well but its in the back burner...until I can find a good donor gen 1...

This may help you avoid some probs

Suspension: Front
Start by removing the entire ttb setup..
1. Disconnect the abs sensors on the front two rotors in the engine compartment (just follow the lines up until you find the
connectors that should be attached to the fender liners.) If you do not have abs, disregard.
2. Next unbolt the calipers and leave the brake lines attached as you can reuse the same calipers for the 2wd rotors and do
not have to re-bleed the brakes..
3. Now disconnect the sway bar end links that attach to the part that sits under the coil spring. Pull the sway bar towards
the front of the bronco so it is out of your way, it does not need to be completely removed.
4. Separate the tie rods from the spindles with a fork tool.
5. Remove front driveshaft.
6. Now you ready to drop everything out!
7. Make sure the truck is supported from behind the radius arms with heavy duty jack stands and let the front end hang
under its own weight. At this time place a jack under the ttb on whichever side you are going to unsecure the springs and
shocks from truck. Jack it up to put pressure on the coil then remove the one bolt that holds the top of the coil in.
Now the coil should be loose. Then unbolt the shocks and remove jack. Repeat other side..
8. Unbolt the radius arms followed by the axles that attach to the crossmember directly under the motor. Be carefully as
the entire setup is extremely heavy and will almost fall out by itself!
9. Install the 2wd parts in pretty much the exact opposite order. The only differences being is that you will only have one
shock absorber on each side, and you will use the rear mount on the stock bronco shock/spring tower.
10. The sway bar will attach to the 2wd parts in the same manner as it did with the factory 4wd setup.
11. Get it aligned!

Rear:
I used first gen lighting complete rear (8.8 with drum) and the lighting rear leaf springs which are 2.5"
wide as opposed to the Broncos 3” wide springs. This imposed some creative thinking. To get a level
stance I had to get some AIM industries drop hangers (not shackles) and remove both the front and
rear leaf spring hanger/mounts. I then acquired some rear leaf mounts from a stock F-150 from a
junkyard with factory shackles. The hangers from AIM have different bolt holes to attach it to the frame
then the Broncos so I welded up the holes on the hangers and redrilled them to match the holes in the
frame on the bronco. With the Bronco sitting on the complete 95 lighting rear end with the leafs in the
lowest position it gives a level stance with stock 95 Lightning front springs. Sounds like a lot of work
but it gives a factory look because it tucks the leafs up out of site whereas doing a axle flip would leave
the leaf down low in sight of everybody. Now all I have left to do is remove half of the bumpstop and
put a small c-notch in the frame above the axle housing to clear it when I hit bumps. As it sits the stock
bump stop is ½” away from the top of the housing.

Using F-150 Lighting springs
1. Support the frame of the bronco and just barely let the tires touch the ground.
2. Using a center punch on the rivets that attach the hanger for both the front and rear of the leaf springs.
Use a 7/16” drill bit and drill through the top of the rivet head. You should be able to punch the rivet out
once you have drilled as deep as the frame.
3. Remove the hangers from the frame, then unbolt the leaf springs from the axle housing.

Tranny/Driveline:

1. Find a 2wd E4OD, I am not sure if the 4wd E4OD can be modified into the 2wd version. I think it has to do with different
tailshafts. (It can)
2. You will need the transmission crossmember from your stock 4wd E4OD plus one that bolts to that one that the tranny
mount bolts to. You can find them in junkyards or Ford for like $60 bucks.
3. All the plugs are the same except you won’t be plugging the transfer case in anymore so you can either cut it off at the
body (the harness) or zip tie it up. I chose to tie it up..
4. You will need to measure from the end of the aluminum tailshaft housing to the flange of the rear end and take that
measurement to a driveshaft shop and have a new one made. I got a brand new metal one made for $266. My measurement
was 39.25 inches but it will vary from truck to truck so make sure you double check your own.
5. This mod alone drops probably 150 lbs. The E4OD, transfer case, converter, and full of fluid was extremely heavy I would
guess over 350 lbs. Please be very careful when removing it!
 
Two pieces of advice I can offer that I learned from my projects:

  1. EVERYTHING that claims to be a bolt-on is a bolt on...you just have to make it fit/work
  2. Multiply your expected cost x 3 or so...that is usually what it turns out being when you include all the little items, things you forgot, and somethings you may have to do 2 or 3 times over

Truer advice has never been given - and it's applicable to any kind of significant mods!
 
Back
Top