Dang. My bad bumpy! That is what Spencedaddy calls you right? Well, I started off by taking the door panels I bought from Copperhead and removing all the trim, door handle/armrest, ect. Totally disassembled it. This takes more time than just hosing down the panel with laquer thinner and calling it good but I wanted them to look goooooood. I was unable to find a trim shop that would help me by selling me the dye. They all wanted me to pay them to put the dye on. So, I called them a few explativley deleteds and preceeded to go about my merry day.
I went to Hobby Lobby (hey I kinda like this place now that I bought something for the L there) and bought some Rit brand dye. Comes in the liquid form and I saw it at Wal Mart later a dollar cheaper (Dont like Hobby Lobby at this point). I said to myself "self, should I try this dye that I found at wal mart on my panel". Self agreed and off I went.
Tested it on the old cracked panel first. Matter of fact, I tested all the products on my old panels before using them on the new ones. I then took and wiped the entire panel down with laquer thinner to clean them. After that I took some Du-Pont interior trim paint (aluminum is the flavor) and painted all my trim pieces. Except the long one on the dash, word of advice, use a screwdriver and take your time, mines broke now.Start out by just barley "dusting them" with paint. Getting to much on plastic to fast will cause it to fish eye. I bought some Rustolium interior vinyl/carpet paint in Flat black.
First thing to do is dye the carpet. Lay them down on thir back and I mixed the dye half a bottle to 20 ounces of HOT water. Real potent stuff at this point so dont spill it. The concrete in my garage has a nice black blob on it now. Using a spray bottle (I used my wifes hair water bottle, she hasnt noticed yet) spray the aforementioned liquid onto the carpet of the doorpanel. It will also stain the plastic in the doorpanel so if you want that to match (like I did) I left it on there. I wiped the overspray off the panel and let it sit until dry. It took me 3 coats like this until they were completely dyed like I wanted them. Be patient. Fabulousness takes time! After they were dried I taped off the door panels and used my Rustolium fabric paint that I mentiond a second ago, and sprayed the "leather" inserts" and speaker grilles. After four coats I called it good. Let dry and I removed the tape and taped off the just painted area. Make sure the just painted portion is very dry. I let mine sit overnight to be sure.
After taping off for the second time, I used an interior paint that I bought from Late Model Restoration that matches perfectly. I sprayed 4 or 5 (cant remember exactly, fumes:tipsy
")
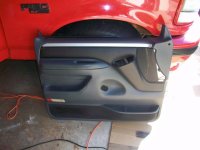
coats on and called it good. Be carfefull removing the tape. I didnt pull any of the Rustolium paint off but I imagine you could if you tried hard enough. I belived that paint prep is the key here. Dont skip wipin down with laqure thinner. I even wiped it down again after the dye and insert spraying. While I was painting the door panels, I took the arm rests and lightly dusted them with matching interior paint. I then put a slightly thicker coat on. Two total coats at this point. I was doing this in between coats for the door panels. I reused my old arm rests vs. the new ones because they already matched the Charcoal interior color I just wanted to freshen them up a tad to match the door panels. After all paint was dry and tape removed I re assembled the door panels and took pics for you guys to look at! Whew! That was the longest post Ive never done! Hopefully this'll help someone.