
needmorepower
No, seriously.
Recently, the alternator on my '95 started making noise due to a bad bearing (I have an overdrive 1 7/8" alt. pulley which I suspect helped do it in) and I decided to replace it myself. An online search netted me a 3G repair kit which consists of a replacement regulator (made in the U.S.), and replacement bearings (China) from S-and-D-repair for only $26.
I don't like the idea of the Chinese bearings on my truck, but they're not hard to replace, so I'll see how long they last.
Here's what I did, if you'd like to try it yourself:
Tools for removing the alternator on a gen 1:
1/2" and 9/16" wrenches to remove positive battery cable from battery
10mm socket to remove positive cable form alternator
flat screwdriver to help remove 2 electrical connectors
15mm socket and breaker bar or 1/2" ratchet for belt tensioner pulley
13mm socket for the 3 bolts holding the alternator down.
impact and 15/16" socket for alternator pulley (I don't have an impact so I took mine to O'Reilly auto parts, they removed and reinstalled my pulley for free)
Tools you'll need to take apart the alternator;
Torx T20 screwdriver bit
8mm socket
flat screwdriver
small bearing puller
small hammer
paperclip or round toothpick (only if you're re-using your regulator)
I assume most everyone can figure out how to remove the alternator, so I'll skip that part, but be sure to disconnect your battery FIRST! Otherwise, you'll short it out sending sparks into your eyes, blinding you and causing you to trip and impale yourself on a screwdriver and die.
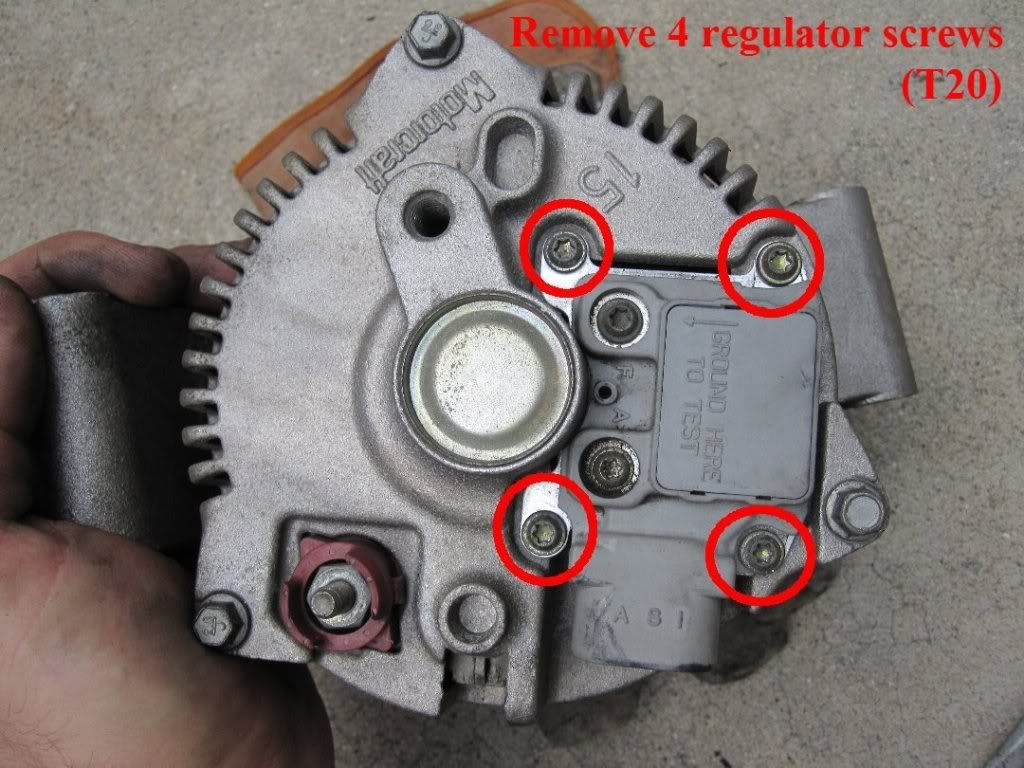
Step 1:
Note the leather glove I used to avoid damaging the threads on the front of the armature shaft.
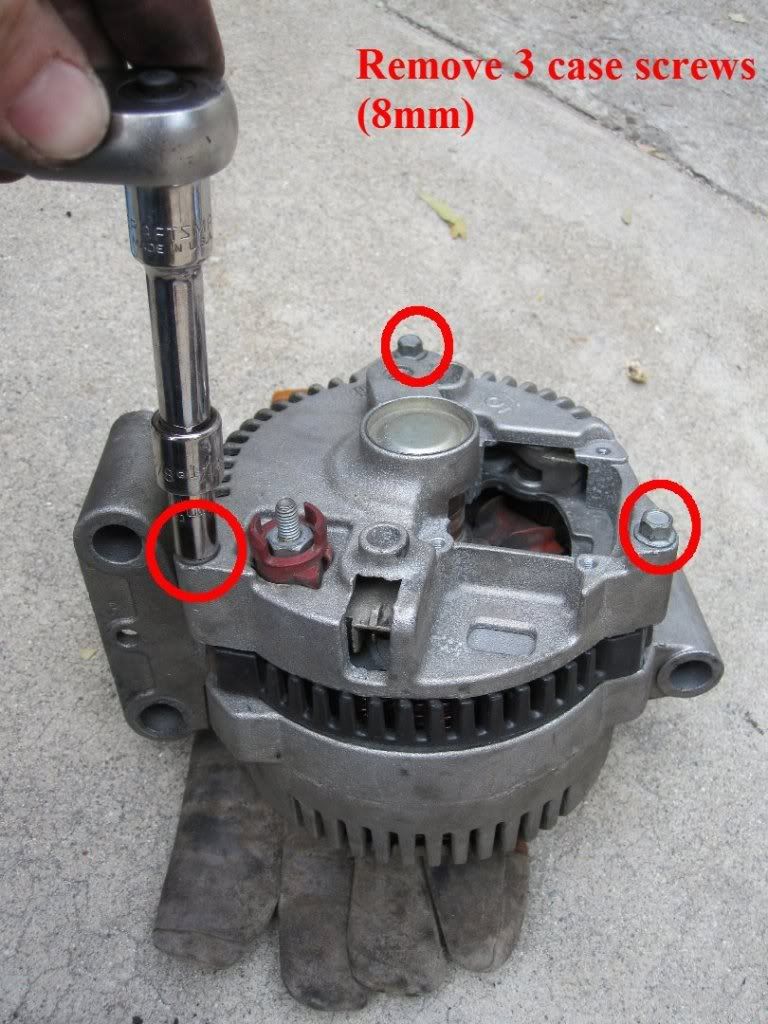
Step 2:
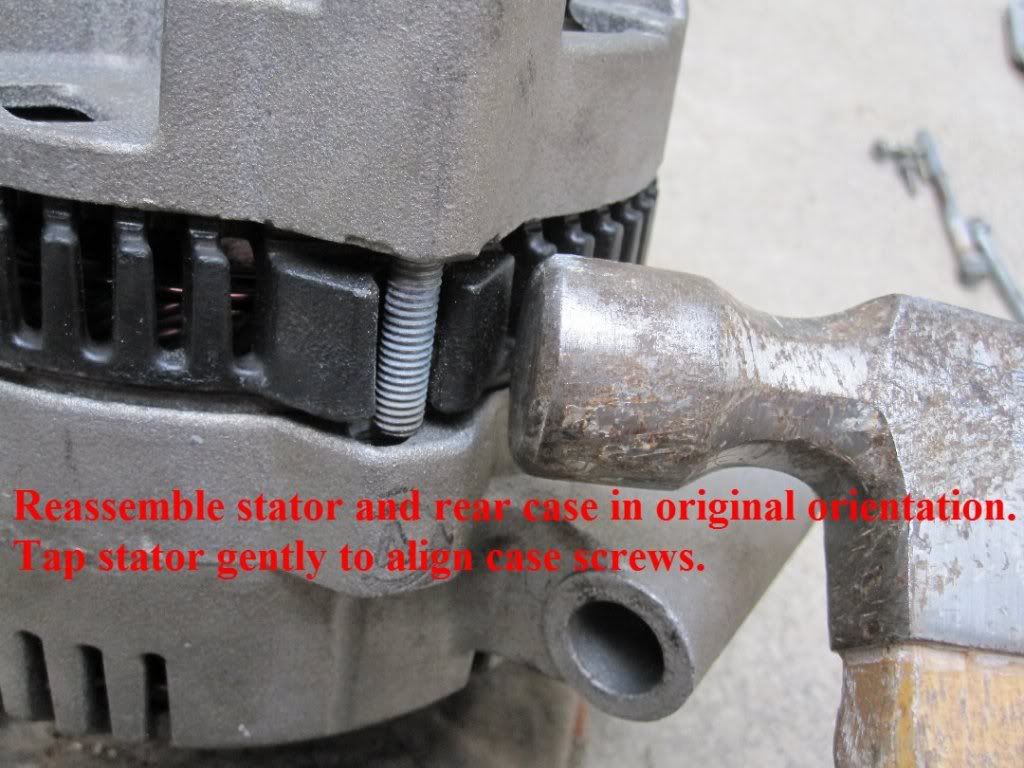
Note the orientation of the alternator positive stud in relation to the case front. It's nearest to the side where the 2 alternator mounting bolts go. There are 3 possible positions to re-install it in, but it has to go back together the same way it came apart, or else the electrical connections will be in the wrong places for your wiring harness. You can mark the case and stator in case you forget which way it goes, but it's easy to correct if you get it wrong.
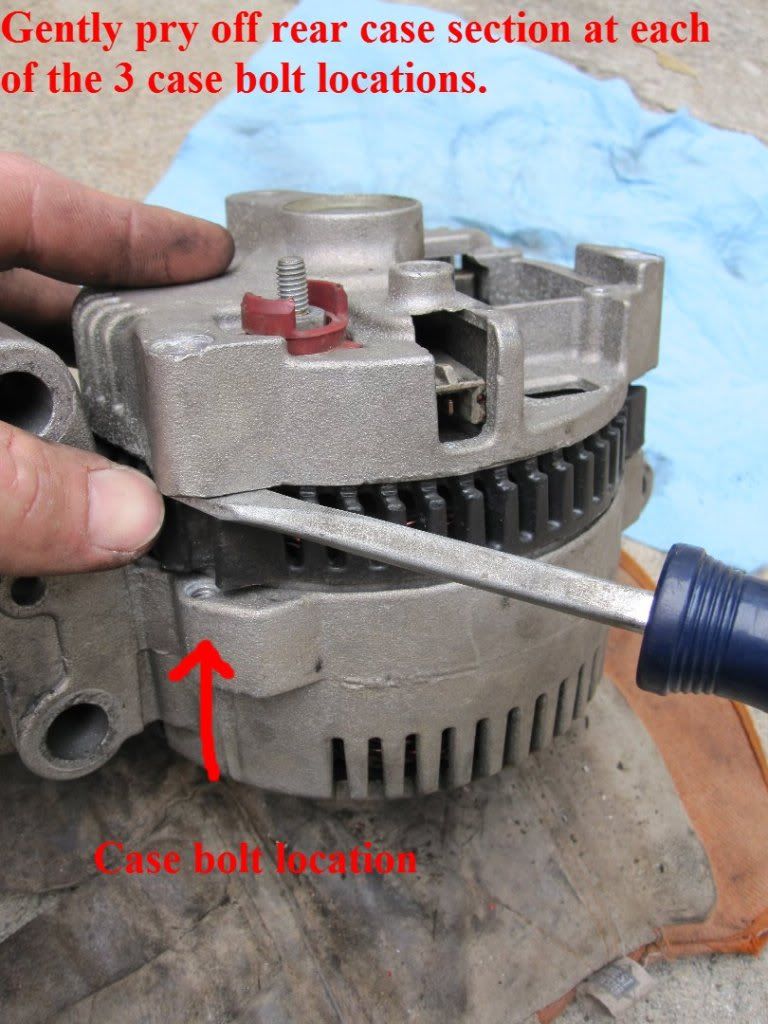
Step 3:
Step 4:
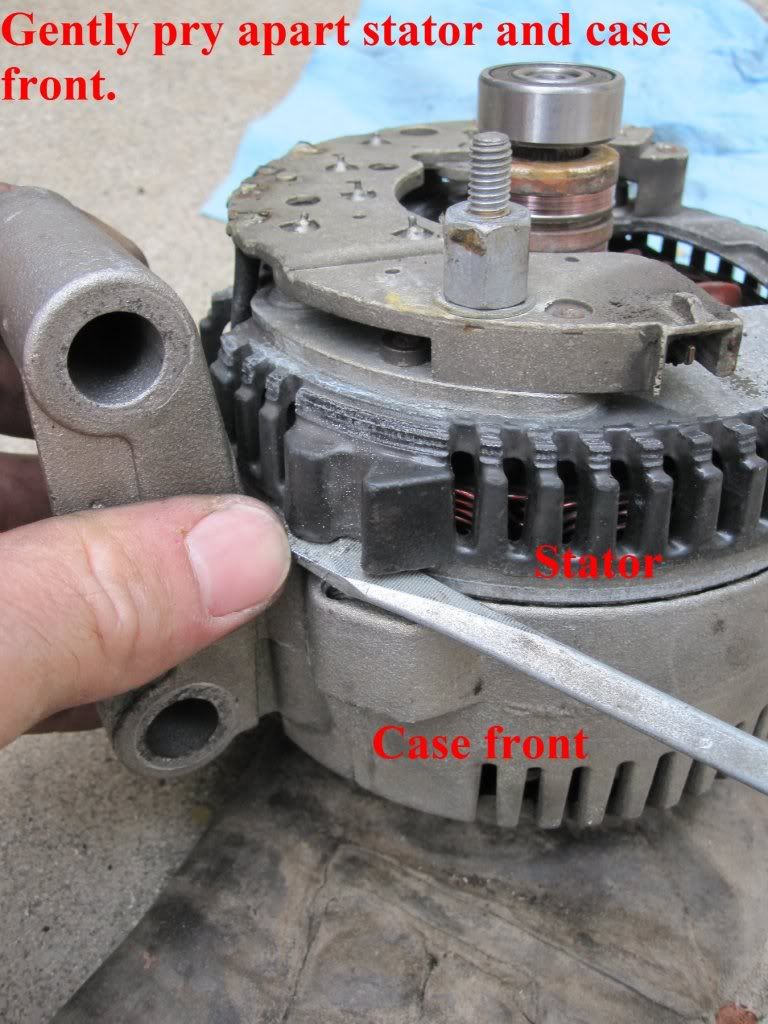
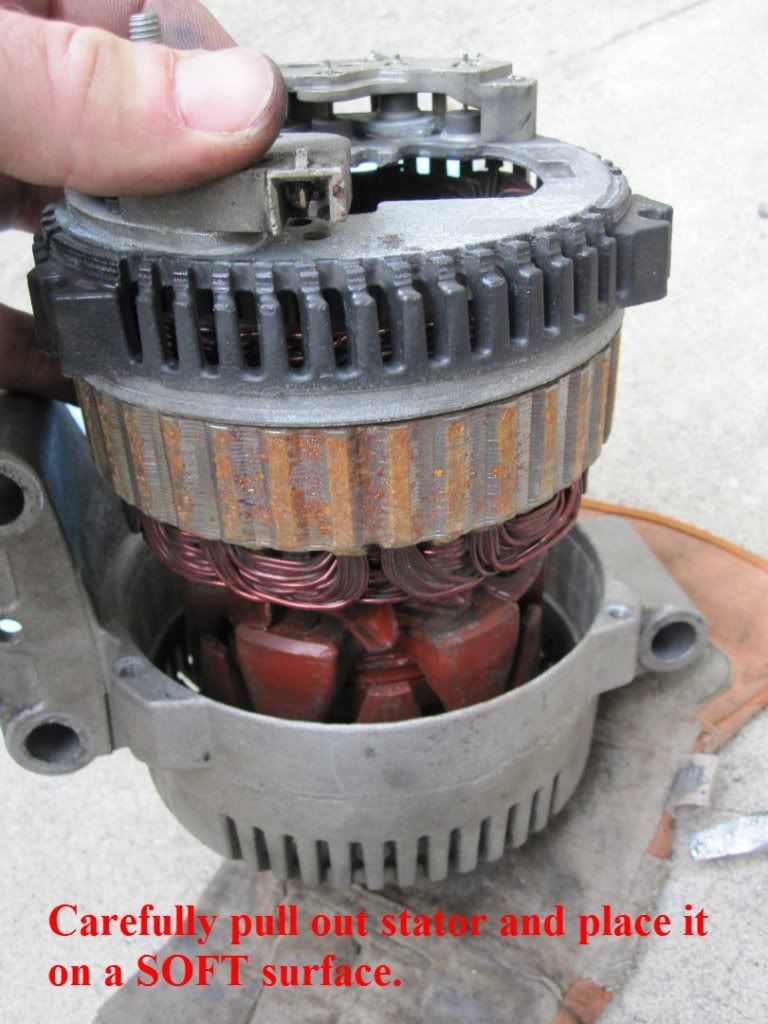
Step 5:
Pull the stator straight out, being careful not to damage the coating on the windings. Set it on a SOFT surface or you'll scratch the coating. A few minor scratches won't hurt it much, but be as careful as possible.
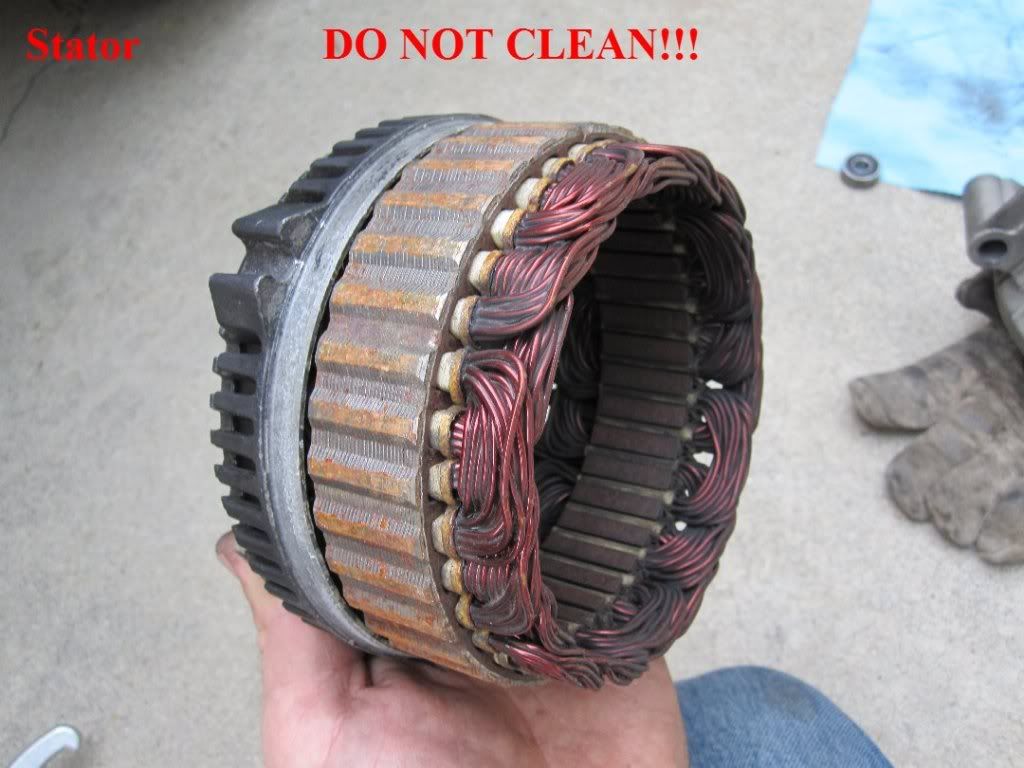
Step 6:
DO NOT CLEAN THE STATOR! It might be possible to clean the stator without damaging it, but I suspect that any chemical like brake cleaner will eat the coating off of the windings, and if that happens, it's toast.
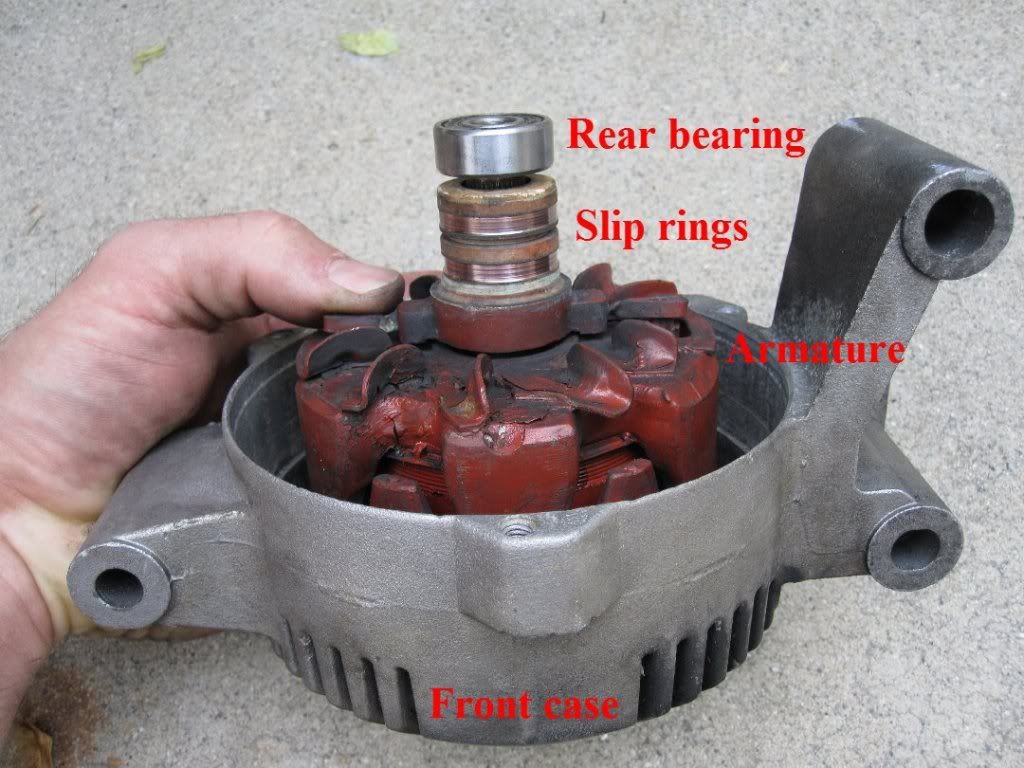
Step 7:
Pull the armature out of the case front. You might have to tap it out via the shaft.
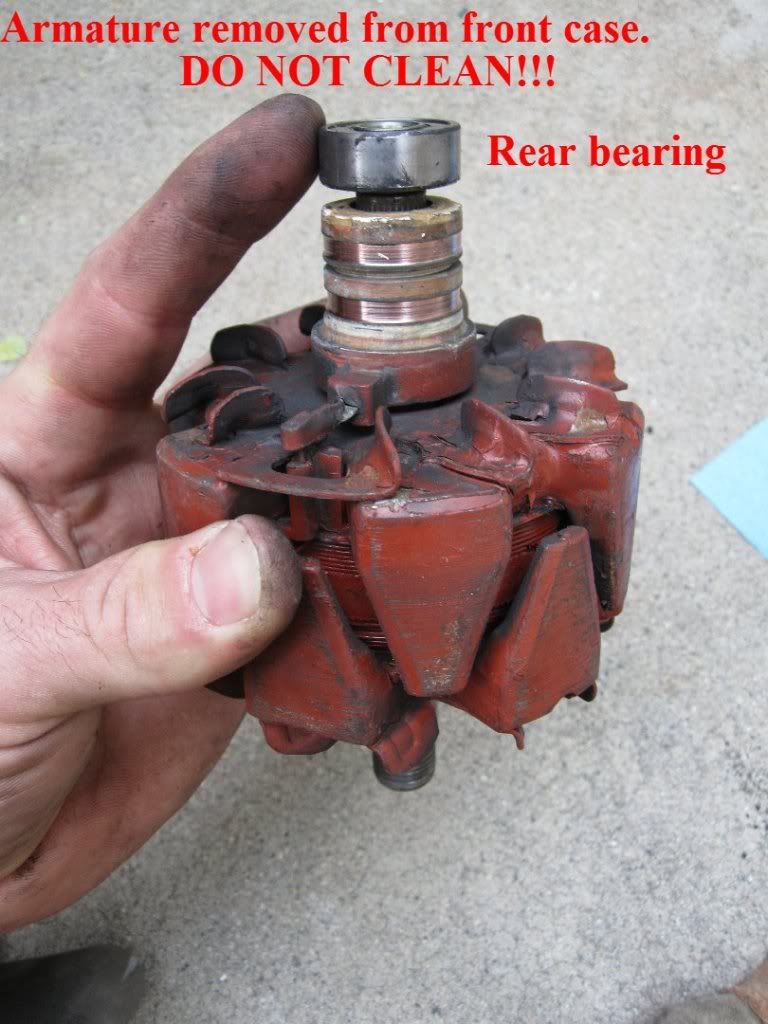
Step 8:
Same as with the stator, I suggest you don't try to clean it, because there are windings inside it also.
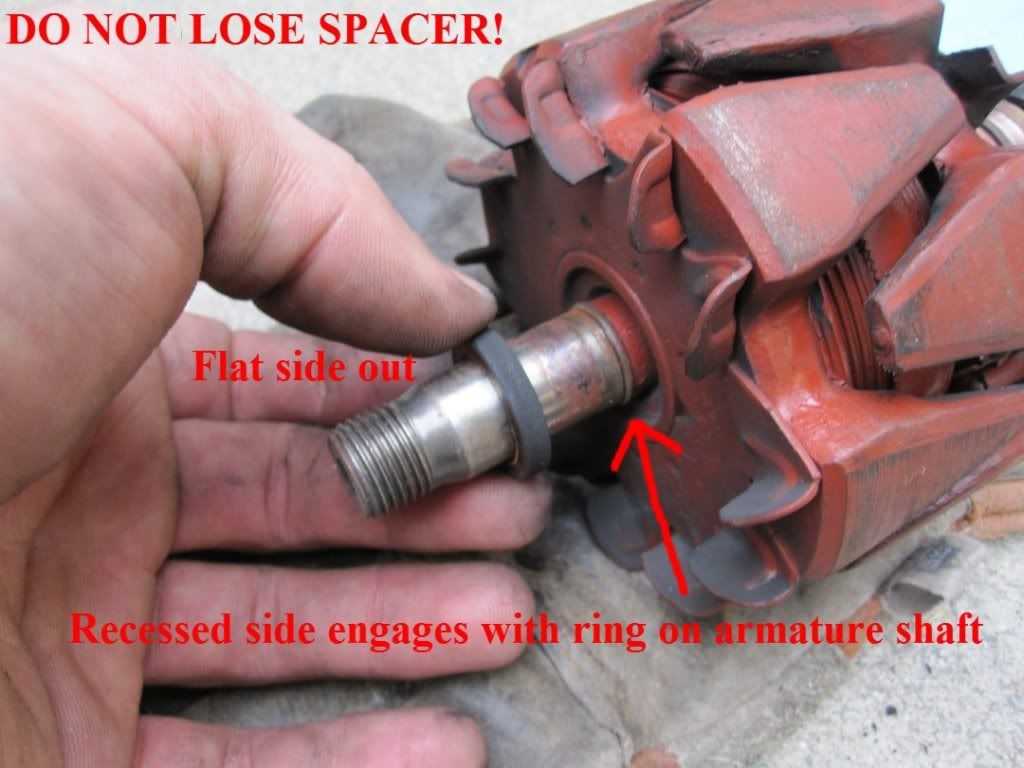
Step 9:
Keep track of this spacer. It likes to fall off and only goes on one way.
Step 10:
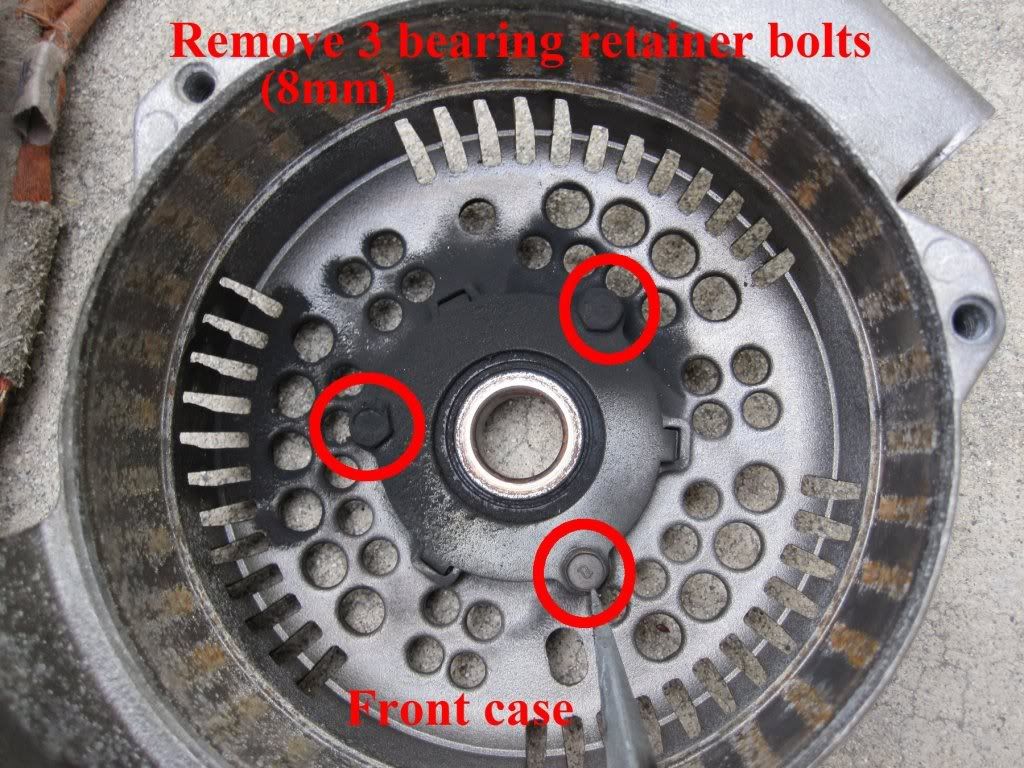
Step 11:
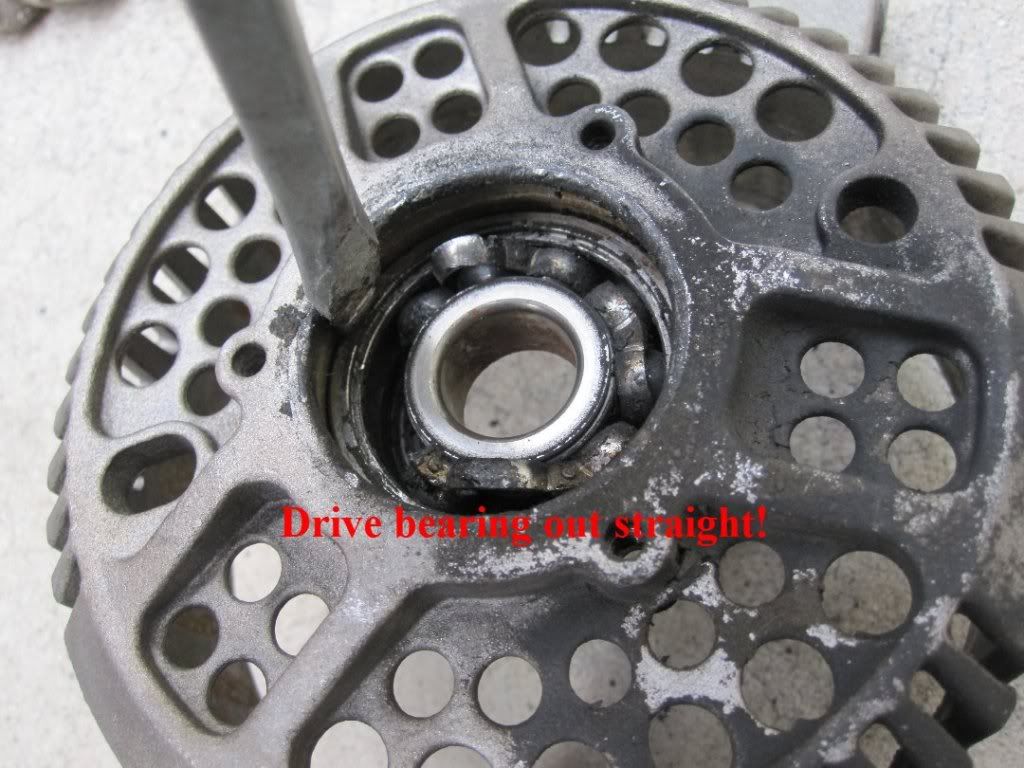
Drive the front bearing out of the case. You can use a large socket and hammer, I used a flat screw driver and hammer.
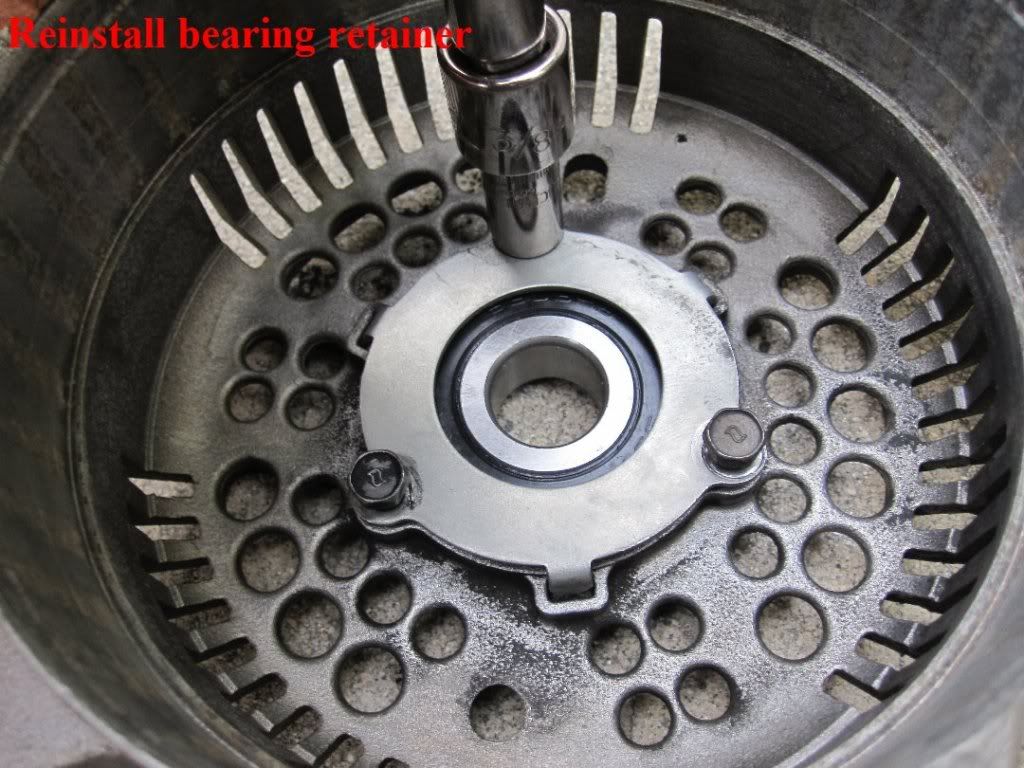
Clean the case front, case rear, and bearing retainer if needed.
Step 12:
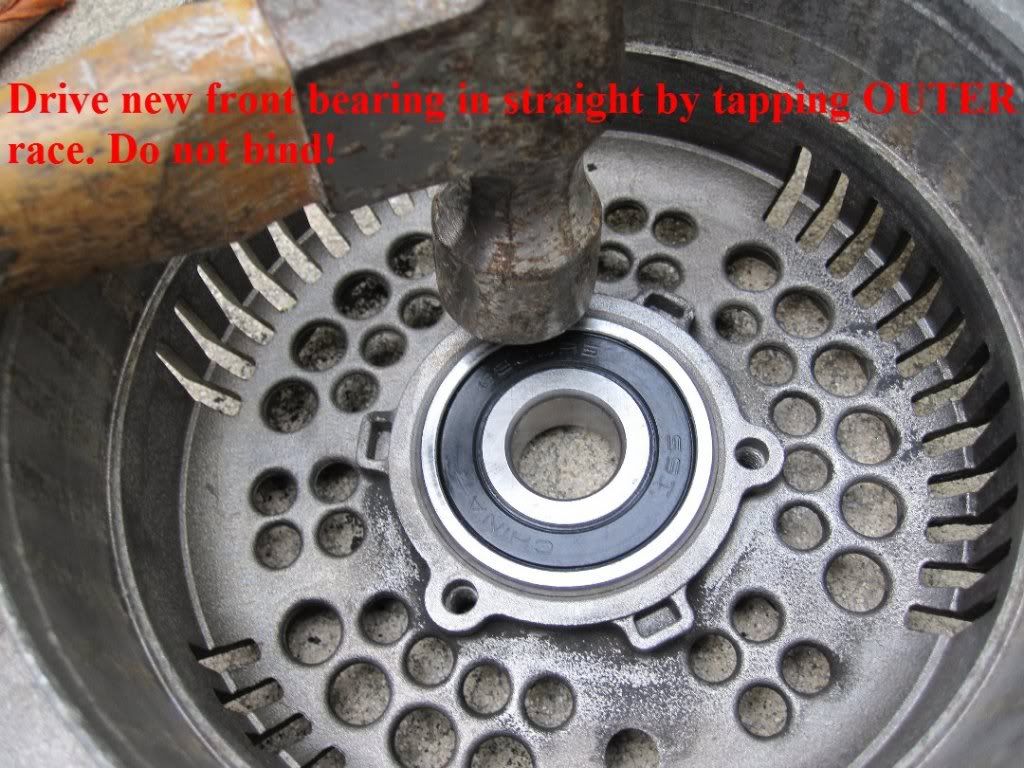
Step 13:
Step 14:
Use a bearing puller to get the rear bearing off of the armature shaft. My puller was too big so I very carefully used my hammer and screwdriver to get it off without damaging anything (not recommended). I was surprised that it came off. I may have gotten lucky.

Step 15:

Step 16:
Put the armature back into the case front. Don't forget the spacer!
Step 17:
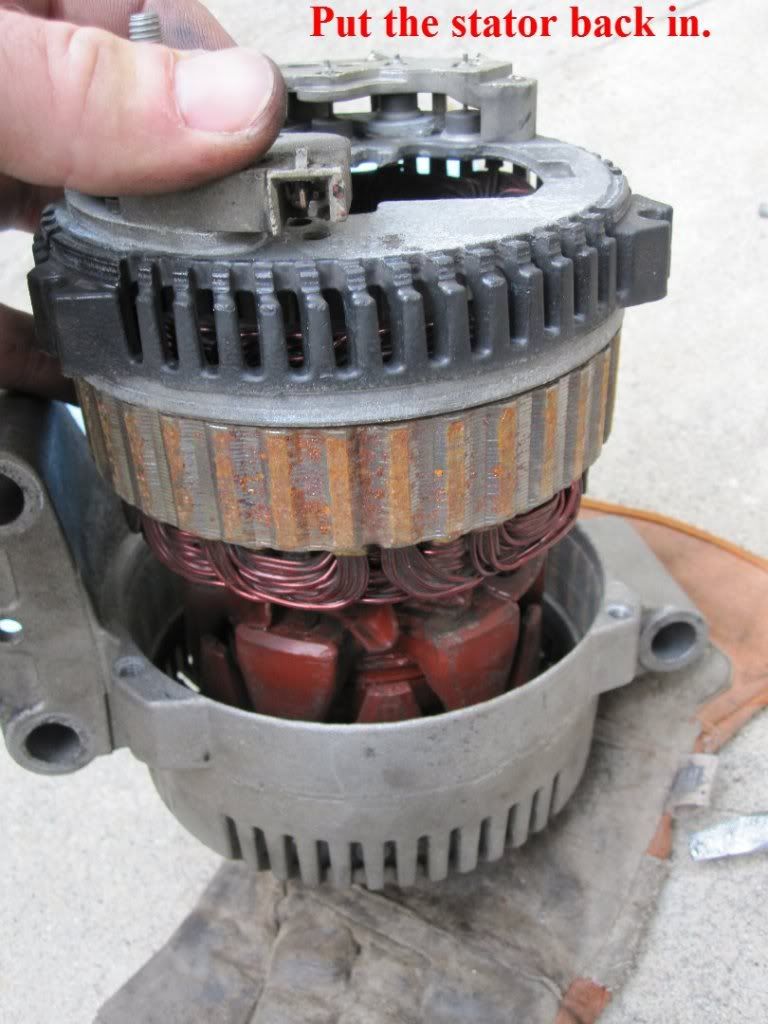
Put the stator back in with the correct orientation to the case front.
Step 18:
Reinstall the case rear and put the 3 case bolts in. If the case front and stator are misaligned, you can tap the stator into the correct position as shown.
Step 19:
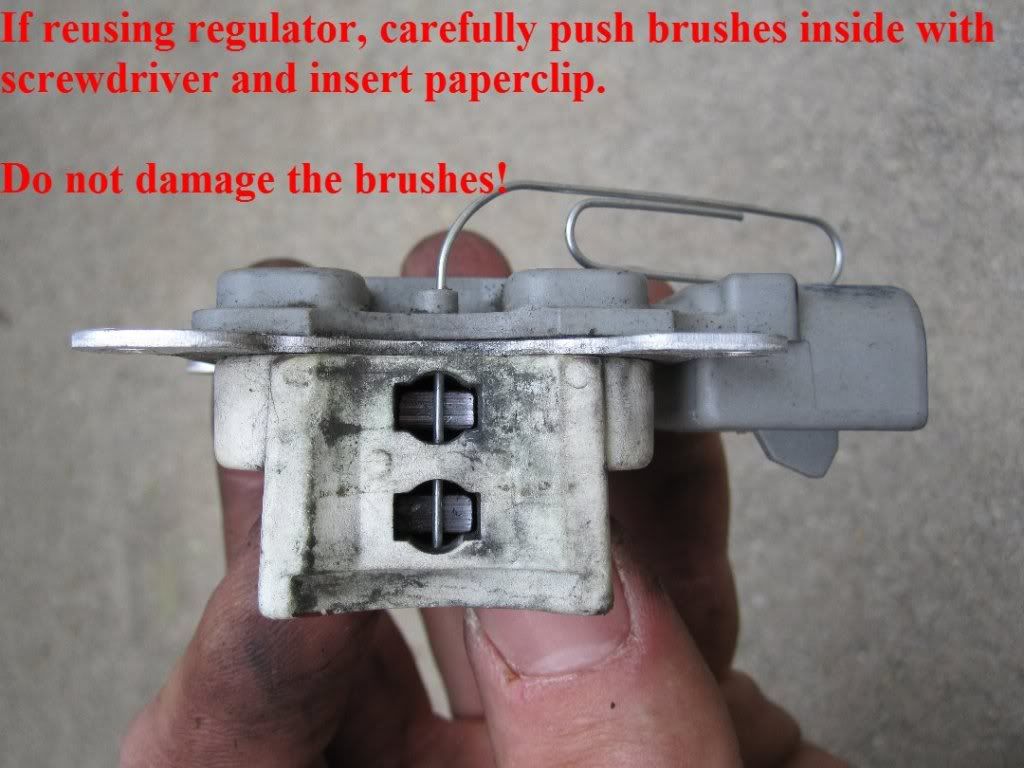
If you use the new regulator, install it now and skip step 19. If re-using the existing regulator and keeping the new one for a spare, do the following:
Step 20:
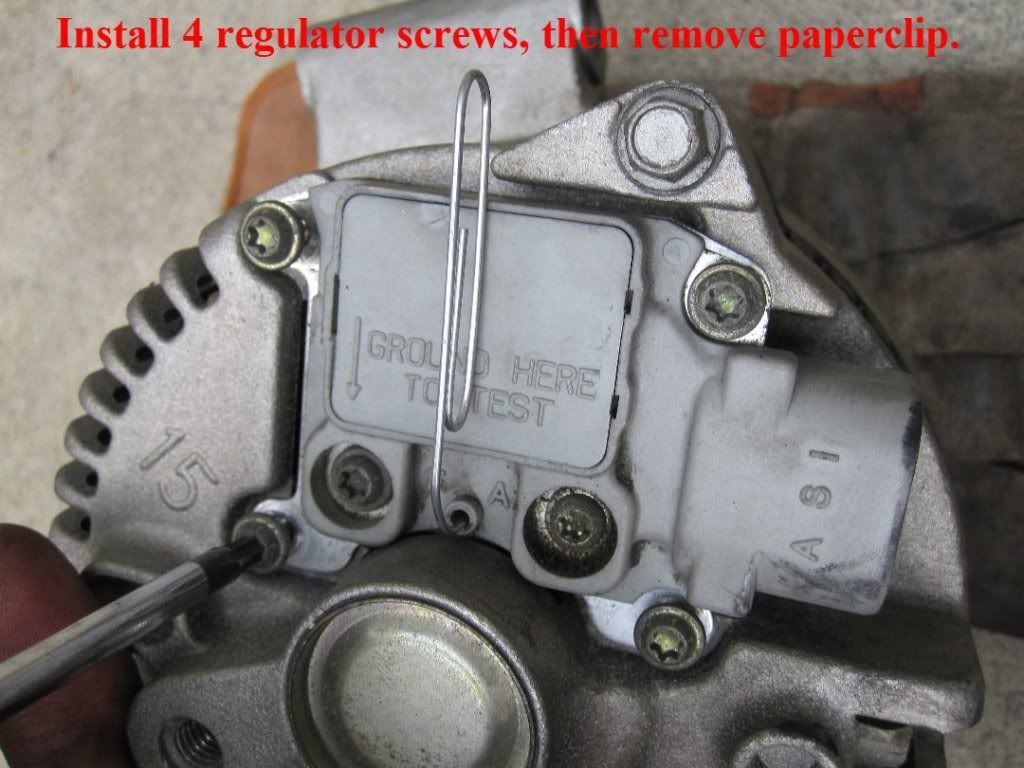
That's it. Reinstall your alternator and you're done. Congrats, you just saved $100 (minus the $20 you're going to send me for the helpful info., or your bad karma will cause you to whack your thumb when tapping in the front bearing, leading you to jerk the hammer back abruptly and cleave your own skull open and die)!
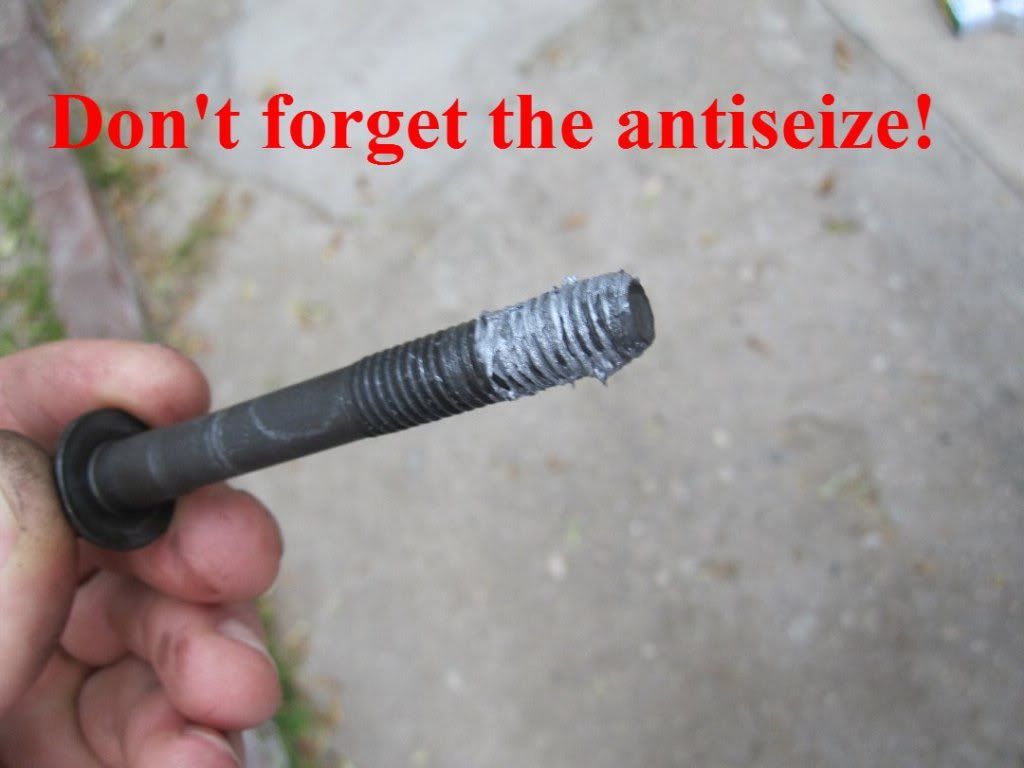
Don't forget to anti-seize the mounting bolts, or the next time you try to pull the alternator you'll break your knuckles trying to crack the bolts loose, causing you to recoil in pain and trip and impale yourself on the bent paperclip you just used and die.
I don't like the idea of the Chinese bearings on my truck, but they're not hard to replace, so I'll see how long they last.
Here's what I did, if you'd like to try it yourself:
Tools for removing the alternator on a gen 1:
1/2" and 9/16" wrenches to remove positive battery cable from battery
10mm socket to remove positive cable form alternator
flat screwdriver to help remove 2 electrical connectors
15mm socket and breaker bar or 1/2" ratchet for belt tensioner pulley
13mm socket for the 3 bolts holding the alternator down.
impact and 15/16" socket for alternator pulley (I don't have an impact so I took mine to O'Reilly auto parts, they removed and reinstalled my pulley for free)
Tools you'll need to take apart the alternator;
Torx T20 screwdriver bit
8mm socket
flat screwdriver
small bearing puller
small hammer
paperclip or round toothpick (only if you're re-using your regulator)
I assume most everyone can figure out how to remove the alternator, so I'll skip that part, but be sure to disconnect your battery FIRST! Otherwise, you'll short it out sending sparks into your eyes, blinding you and causing you to trip and impale yourself on a screwdriver and die.
Step 1:
Note the leather glove I used to avoid damaging the threads on the front of the armature shaft.
Step 2:
Note the orientation of the alternator positive stud in relation to the case front. It's nearest to the side where the 2 alternator mounting bolts go. There are 3 possible positions to re-install it in, but it has to go back together the same way it came apart, or else the electrical connections will be in the wrong places for your wiring harness. You can mark the case and stator in case you forget which way it goes, but it's easy to correct if you get it wrong.
Step 3:
Step 4:
Step 5:
Pull the stator straight out, being careful not to damage the coating on the windings. Set it on a SOFT surface or you'll scratch the coating. A few minor scratches won't hurt it much, but be as careful as possible.
Step 6:
DO NOT CLEAN THE STATOR! It might be possible to clean the stator without damaging it, but I suspect that any chemical like brake cleaner will eat the coating off of the windings, and if that happens, it's toast.
Step 7:
Pull the armature out of the case front. You might have to tap it out via the shaft.
Step 8:
Same as with the stator, I suggest you don't try to clean it, because there are windings inside it also.
Step 9:
Keep track of this spacer. It likes to fall off and only goes on one way.
Step 10:
Step 11:
Drive the front bearing out of the case. You can use a large socket and hammer, I used a flat screw driver and hammer.
Clean the case front, case rear, and bearing retainer if needed.
Step 12:
Step 13:
Step 14:
Use a bearing puller to get the rear bearing off of the armature shaft. My puller was too big so I very carefully used my hammer and screwdriver to get it off without damaging anything (not recommended). I was surprised that it came off. I may have gotten lucky.
Step 15:
Step 16:
Put the armature back into the case front. Don't forget the spacer!
Step 17:
Put the stator back in with the correct orientation to the case front.
Step 18:
Reinstall the case rear and put the 3 case bolts in. If the case front and stator are misaligned, you can tap the stator into the correct position as shown.
Step 19:
If you use the new regulator, install it now and skip step 19. If re-using the existing regulator and keeping the new one for a spare, do the following:
Step 20:
That's it. Reinstall your alternator and you're done. Congrats, you just saved $100 (minus the $20 you're going to send me for the helpful info., or your bad karma will cause you to whack your thumb when tapping in the front bearing, leading you to jerk the hammer back abruptly and cleave your own skull open and die)!
Don't forget to anti-seize the mounting bolts, or the next time you try to pull the alternator you'll break your knuckles trying to crack the bolts loose, causing you to recoil in pain and trip and impale yourself on the bent paperclip you just used and die.
Last edited:
 ldtu:
ldtu: